To create a form using Elementor Pro, we will drag and drop the form from Elementor pro, and then under “form fields” we will select type for different types of form input fields such as Text, Email, Tel, Number, etc. 
Pleasse Note:- Under the “Action After Submit” category, We have “Add Action” Just below that we have an input tab, when we click on that we can choose different actions we want to do. “Collect Submission” will collect data filled up by the user under submission, we can reach the submission section by clicking on the “submission” under the collect submission category that will appear when we select this.

Form Without Step

Enter You Details

Name Age  Class  Subject
       
       
Way to use step
Step 1

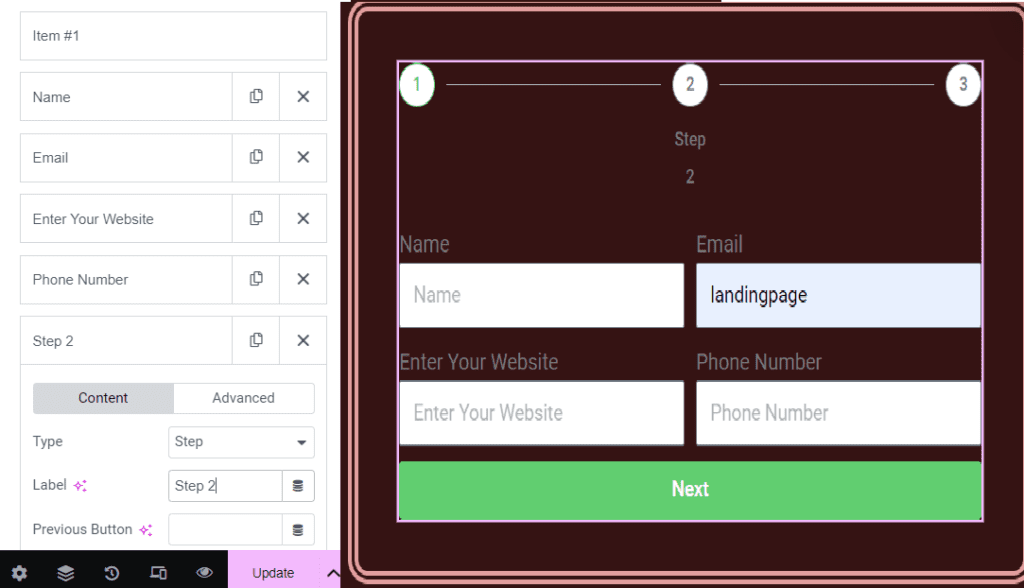
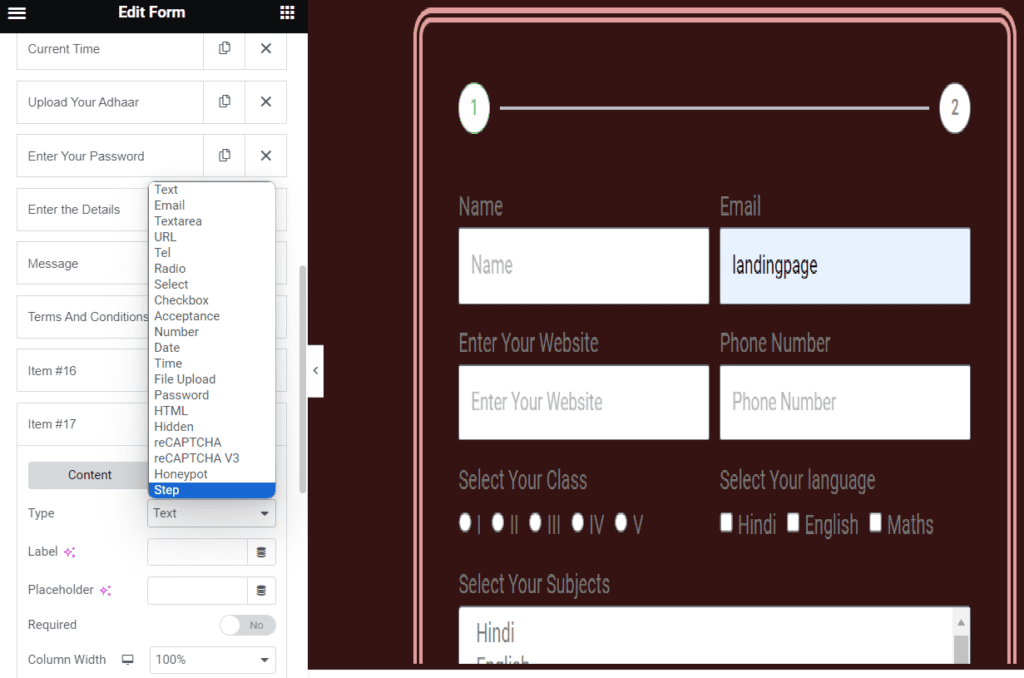
We use step when we have a long form and now we want to show this long form into different parts. We need to first select the item # 17 section and under the content section, select “Step” from the dropdown under type. As soon as we select it, the form will have two steps as shown in the image.

Step 2

We will use the step from the type dropdown. Since we have used step after the phone number so second step will start from the phone number as shown:-

Step 3

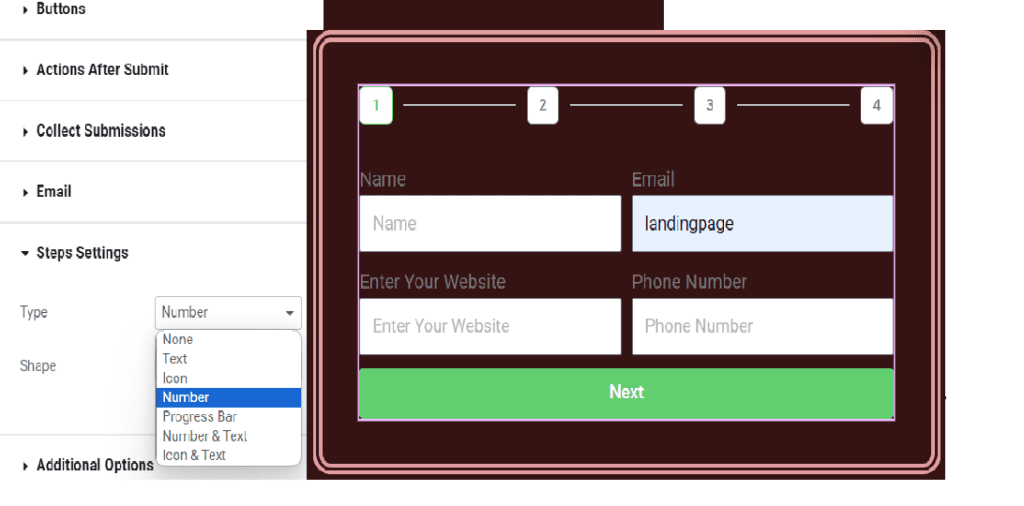
We use step settings to style the step numbers or icons as shown:-

Step 4

This tells what you want to do after clicking on submit. The more options you choose from the dropdown, the more tabs will pop down to style and apply settings.

Form With Step

Enter You Details

Name Age  Class  Subject


To create this we will click on “Add Template”  >> Search for “contact” under block section >> Choose and edit accordingly. Please note that we have used the “animated headline” and added a class to position the email section. The code can be seen under custom CSS.  To set your location, click on the pencil icon on the map and then enter the location you want. To get your location, open Google Maps search for your address, and then click on share, copy the link, and paste it under location. In the above line, “animated text” element was used

Contact

For any inquiries please email

Scroll to Top

Step 1:- Choose the section on which you want to add the shape divider
Step 2 :- Select the section >> Style >> Shape Divider
Step 3:- If the above one does not work, add a section wherever you want and give it any height, and then the background color and then shape the divider shape and the set color accordingly.

Step 1:- Take two columns of equal size
Step 2:- On the left section you can use widgets of headings, text, buttons, or anything of your choice
Step 3:- Design the left section the way you want.
Step 4:- Set a background image in the entire section, not the left section
Step 5:- Select the left section and give margin from the top and bottom
Step 6:- In the main section column gap should be no gap under the layout and the background overlay will have a gradient color, the first color should be your back
background-color so we will take white color, location 40% to show 40% white background, and the second color should be transparent and location 0
% and Angle should be 90 degrees and opacity 1
Step 7:- In the mobile screen, set margin 0 to the first column add the same image in the second column, and then change
the position of the column, target the main section > advanced > Responsive > reverse column(To bring first column to second number) and then hide this image on tablet and desktop

Step 1:- Elementor >> Settings >> Features Tab >> Page Transitions [should be default or active] >>Save Changes.

Step 2:- Go to the site settings by opening any page with Elementor from where we drag and drop widgets. So, site settings >> page transition >> page transition to style the “Preloader page” and then preloader to choose the types of preloader.

For more info visit Youtube

First we will target the section we want to go on clicking any text and give it a name under advance >> css id (give any name) and now go to the text section and under link pass #name and update

We will create any template we want and then copy the short-code of the template available at dashboard >> template >> popup >>copy the shortcode. Now to use it, we will go to any page or post where we want to add that template and then drap a drop “shortcode” widget and inside the section past the shortcode that we copied and update